IIS HL7 Tester
Introduction
In 2013 the Immunization Information Systems Support Branch (IISSB) of the Centers for Disease Control and Prevention (CDC) conducted an Immunization Information Systems (IIS) Interoperability Status Check project to test and verify that IIS HL7 interfaces were able to accept the 7 NIST test messages that certified EHR’s must be capable of sending to IIS in 2014. The results of this project showed that IIS have made great progress in supporting HL7 2.5.1 standards but that still some work remained in order to bring all IIS in conformance to the same standard.
It was clear from this and other projects that there exists a need for a standardized and automated process for ensuring that an IIS HL7 interface meets national standards. So, in the summer and fall of 2013 the Open Immunization Software (OIS) project convened a set of technical meetings with representatives from five IIS to develop a testing process and software to test IIS HL7 interfaces. The goal was first to create a system for testing the Data Quality Assurance (DQA) system and second to create a standardized system that other IIS could use for internal testing.
The alpha version of this new testing process has been available since September, and already several IIS vendors and projects have been successfully using the software to find and fix conformance issues in their HL7 interfaces. The beta version has now been released and the entire IIS community is being invited to use the software in their testing process, both for testing purposes and to give feedback to OIS about improvements or fixes that can be made in preparation for the final stable release.
Testing Process
The testing process is described in the following documents:
Tool Installation
The installation process has been greatly simplified by a new installation web page that will guide you through the steps of the process. The entire process should take about 15 minutes
Please note that the IIS HL7 Tester is also known as the Simple Message Mover (SMM) which is used for the purpose of connecting a local EHR that exports files to an IIS in realtime. The installation process here will install the same software as the SMM but instructs the user on how to configure it specifically for testing purposes. Besides the differences in name the software is exactly the same.
Local Folder Organization
 The IIS HL7 Tester uses local folders to store and
organize HL7 messages sent and the reports created. It is important to understand the following folders when configuring the IIS HL7 Tester:
The IIS HL7 Tester uses local folders to store and
organize HL7 messages sent and the reports created. It is important to understand the following folders when configuring the IIS HL7 Tester:
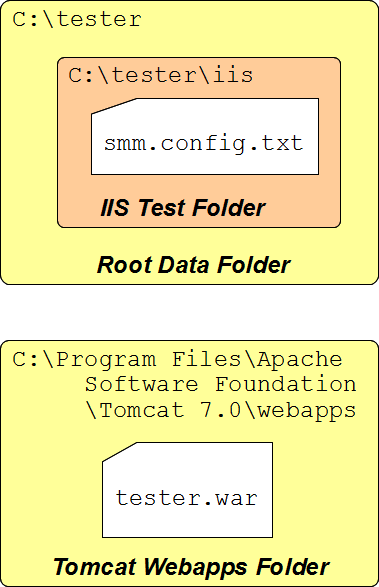
- Root Data Folder: You must create or identify a folder that can be dedicated for use by the IIS HL7 Tester. Within this folder you create other folders which will contain the data to be transmitted to the IIS. It is important to understand that the IIS HL7 Tester will not be installed in the Root Data Folder, rather this folder will be used to store connection configuration and store the results of testing.
- IIS Transfer Folder: Within the Root Data Folder there must be at least one folder to represent the
transfer interface to the IIS. If you are connecting to more than one IIS or if you have more than one connection to the same IIS then you
will have one IIS Transfer Folder for every connection. In the example on the right a folder has been named 'iis' to indicate that the data in
this folder will be sent to an IIS. As part of the installation process you will be guided to create and then save the
smm.config.txtfile directly into the IIS Transfer Folder you have created. Thesmm.config.txtfile is the signal to the IIS HL7 Tester that there is a connection to be tested. - Tomcat Webapps Folder: This is the installation folder for the IIS HL7 Tester application itself. You
will not spend much time here except when installing or upgrading. Tomcat regularly reviews this directory and if a file with the extension
.waris placed here, Tomcat will automatically install it as a new application within the Tomcat environment. The final step in installation will be to download the tester.war and save it into this directory.
How To Videos
A series of how-to videos have been created to show how the IIS HL7 Tester can be used to test an IIS. These are all about 10 minutes long and posted on YouTube.
- Installing the IIS HL7 Tester
- Upgrading the IIS HL7 Tester
- Setting Up Connections
- Editing Test Cases
- Running IIS Test
- Running IIS Stress Test
Installation Web Page
The installation process is guided by an interactive installation web page that takes you through the four steps of the process. It is recommended to begin on the first step and follow the process through each step, keeping this page open for reference.
- Prepare: Create the local folders needed.
- Configure: Create and download the
smm.config.txt. - Install: Setup Java and Tomcat.
- Download: Get and save IIS HL7 Tester application.
Step 1: Prepare
If you have not already done so, begin the process by clicking on the first step list above.
Sections A and B: In the first two sections you will need to identify or create the Data Root Folder and the IIS Testing Folder, then copy/paste the folder names into their respective places in the installation web page. You should note that for the Root Data Folder you should paste in the entire directory address (including the Windows driver letter if on Windows). It is highly recommended that you copy this directory from the address bar of the folder window and past it into the form to ensure that you don't introduce a typo. For the IIS Testing Folder you only need to indicate the name of the folder without the full path.
Section C: Once you have created the folders you will need to choose a template for configuration. Choose a template that represents the system you are looking to integrate with. The IIS HL7 Tester has been tested and configured to connect to these systems and a template has been created to make setting up the connection as easy as possible. If you do not see your IIS listed you will have to choose a default template.
Step 2: Configure
Instructions for the configuration page will be shown with instructions specific to the template you chose. Ideally you should have already requested and received credentials for your IIS. If you have not, the form will indicate which information is expected from the IIS so when you request access you can be sure you ask for and receive all that you need to know in order to connect.
Once you have the credentials, please fill in the fields according to the instructions given on the page. You may notice that some fields will already have values filled out. For example, the URL or address for an IIS may already be indicated. You will want to review the values set to ensure they are optimal or correct for your installation. If you see any discrepancies or errors based on what the IIS has given you, please forward these to the IIS HL7 Tester development team so we can fix the template.
Please note that the credential information you place in this application is not stored on this site and can not be retrieved for later viewing. You should have your own system for storing and tracking your credentials. This step in the installation creates a configuration file that will include the credentials in the proper form for your local IIS HL7 Tester instance to read them. In addition, the password you enter will be hidden with a security hash function so that when you view the resulting file you will not be able to read the password back easily. You must still protect this configuration file as a highly secure document and protect from non-authorized users gaining access, as the password can be decrypted and the other information in plain text be used to gain access in your name.
After filling out the form, click the download button and save the file in the IIS Testing Folder that you created in Step 1. The file
created must be named
smm.config.txt
. This is the default name you will be given for saving. Windows users should note that by default Windows hides the extension
.txt
and displays this as
smm.config
. The name of this file is critical as the SMM determines if a folder is designated as a IIS Testing Folder only if an
smm.config.txt
file is found in a directory. Be sure to follow this step correctly or your interface will not be configured by SMM.
Step 3: Install
This step is not specific to IIS HL7 Tester but requires that you install the latest version of Java and Apache Tomcat. You likely have Java installed, and you may only need to confirm it is there before installing Apache Tomcat. The instructions for installing Apache Tomcat differ depending on the operating system. Complete instructions are given on the links provided in the installation web page.
When the installation is complete you will need to indicate where Tomcat is installed. You will need to know this information in order to install, start and stop the IIS HL7 Tester on Tomcat. Copy and paste the full directory of where Tomcat is installed before continuing to the next step.
Step 4: Download
Now that Tomcat is installed and the IIS HL7 Tester directories are ready and configured, you can download and install the IIS HL7 Tester application. The IIS HL7 Tester is a simple zip file that is saved into a Tomcat directory, when Tomcat sees it, it expands it, installs the application and immediately starts it. This page allows you to configure a specific version of IIS HL7 Tester to match your system.
Software Version: The first step is to select the software version you wish to download. Unless otherwise instructed leave it on the one already selected.
Root Data Folder: This is the folder configured in Step 1. If you have been following the steps in order this should be pre-filled with a complete folder path. If it is empty, it is recommended that you begin back at Step 1.
Username & Password: Set these to any value you would like. You will need this information to gain access to the testing application once it is installed.
Clicking download will start the process of downloading and you will be prompted to save the file. It is important that you save it to correct
location in order for Tomcat to recognize it. It must be saved into the
webapps
directory where Tomcat is installed. Tomcat continuously monitors this folder for new files with an extension of
.war
. Save the file as
tester.war
directly in the webapps directory. Within a few seconds Tomcat will create a folder called
tester
in the same directory. This will indicate to you that Tomcat has deployed (installed) IIS HL7 Tester. If you have followed the steps corrected
SMM should be up and running.
The IIS HL7 Tester should be up and running on your system. To verify and gain access follow these steps:
- Verify that Tomcat is installed and running: Go to http://localhost:8080 on the local machine where Tomcat was installed. Please note that the port number in this link is set to the default for Tomcat. If you changed the port number from the default please modify the URL to match. Tomcat can also be accessed externally by simply changing the localhost address to the address of the Tomcat server system.
- Now pull up the login page for the IIS HL7 Tester: Go to http://localhost:8080/tester/LoginServlet. You may have to change this link if the port number and machine name are different.
- Login with your crendentials: Use the credentials you defined when you downloaded the tester.war. By default they are admin for the username and admin for the password.
Upgrading IIS HL7 Tester
Upgrading IIS HL7 Tester can be done by following the installation steps with the following changes:
- Prepare: Normally you will want to repeat this step. This will ensure that your configuration file is up-to-date as possible.
- Configure: Normally you will want to repeat this step. This will ensure that your configuration file is up-to-date as possible.
- Install: Java and Tomcat should be installed previously. This step is only needed if Java or Tomcat is not operating correctly.
- Download: Before downloading the latest version, follow these steps:
- If Tomcat is running, stop it. In Windows this can be done through the Windows service panel.
- Find the Tomcat webapps directory and delete the
tester.warfile and thetesterfolder. This removes the old version of IIS HL7 Tester from Tomcat. - Follow instructions to download the latest war file.
- Start Tomcat up.
Frequently Asked Questions
Is my connection information saved on the installation site?
No. Some of the information, such as folder names is saved while you are using the application. But after a certain period of inactivity, or if you close your web browser, this information will be discarded. The website is to assist you during the installation process but should not be used to store or manage connection information.
How can I tell if the IIS HL7 Tester is actually running and configured properly?
You will first want to examine the IIS Testing Folder where you saved the smm.config.txt file. If IIS HL7 Tester has started
up successfully, at least once, you should see a new set of folders created in this folder:
request
,
response
, etc. These are the folders that are needed by SMM to transmit files. SMM leaves it's current status in a file that starts with the phrase
smm-is
... There is no information in the file, only the name indicates the status. A common status you will see is
smm-is-waiting
, which indicates that IIS HL7 Tester is up and running with no problems and is waiting for data to send. You can see the last timestamp on the
file and see when IIS HL7 Tester wrote that file. If it hasn't been changed for over a minute or so then you can know that IIS HL7 Tester is not
running.
What if Tomcat does not deploy/install my tester.war?
You will first want to ensure that Tomcat is up and running. On Windows, Tomcat is started and stopped from the services panel. Open the
services panel and if Tomcat is not running, select it and click on the start button. The
tester.war
should then deploy. On other systems you will need to follow the Tomcat instructions to understand how to start and stop Tomcat. You can also
verify if Tomcat is running by opening a web browser on the system it is running on and trying this link: http://localhost:8080/.
(Note: during installation you were prompted about which port number to run Tomcat on, 8080 is the default. If you selected a different port
number than this default you will need to change the address for Tomcat.) If you see a default Tomcat screen with the Tomcat log then Tomcat is
running.
How do I upgrade the SMM?
Upgrade process is similar to the install process except that some of the steps can be skipped if there are no changes. To deploy/install a new
war you will need to stop Tomcat, delete the
tester.war
file and the
tester
directory, and start Tomcat. This removes the IIS HL7 Tester application completely. A new
tester.war
can be downloaded and installed. from Tomcat.
How do I install more than one connection?
Simply follow Steps 1 and 2, creating a new IIS Testing Folder in the Root Data Folder that should already exist. Download and
save the
smm.config.txt
in the new folder, then stop and start Tomcat so that IIS HL7 Tester will rescan the Root Data Folder for the new interface.